Automation & Hacking with Raspberry Pi
The latest Ideation & Protyping Lab tutorial highlights the depths of automation and explains 'How to hack your Bluetooth radio to Autoplay Web Radio'.
The Ideation & Prototyping Lab also wants to keep pace in the age of increasing automation. Therefore, it has transformed the Bluetooth radio belonging to CityLAB Berlin into a web radio. The resulting tutorial deals with the Raspberry Pi (RasPi), its autostart configuration & Bluetooth radios. This articel describes how all these things are connected to each other and how to hack an autoplay web radio with the help of a RasPi. You can find the detailed tutorial on GitHub*.
Basic Idea
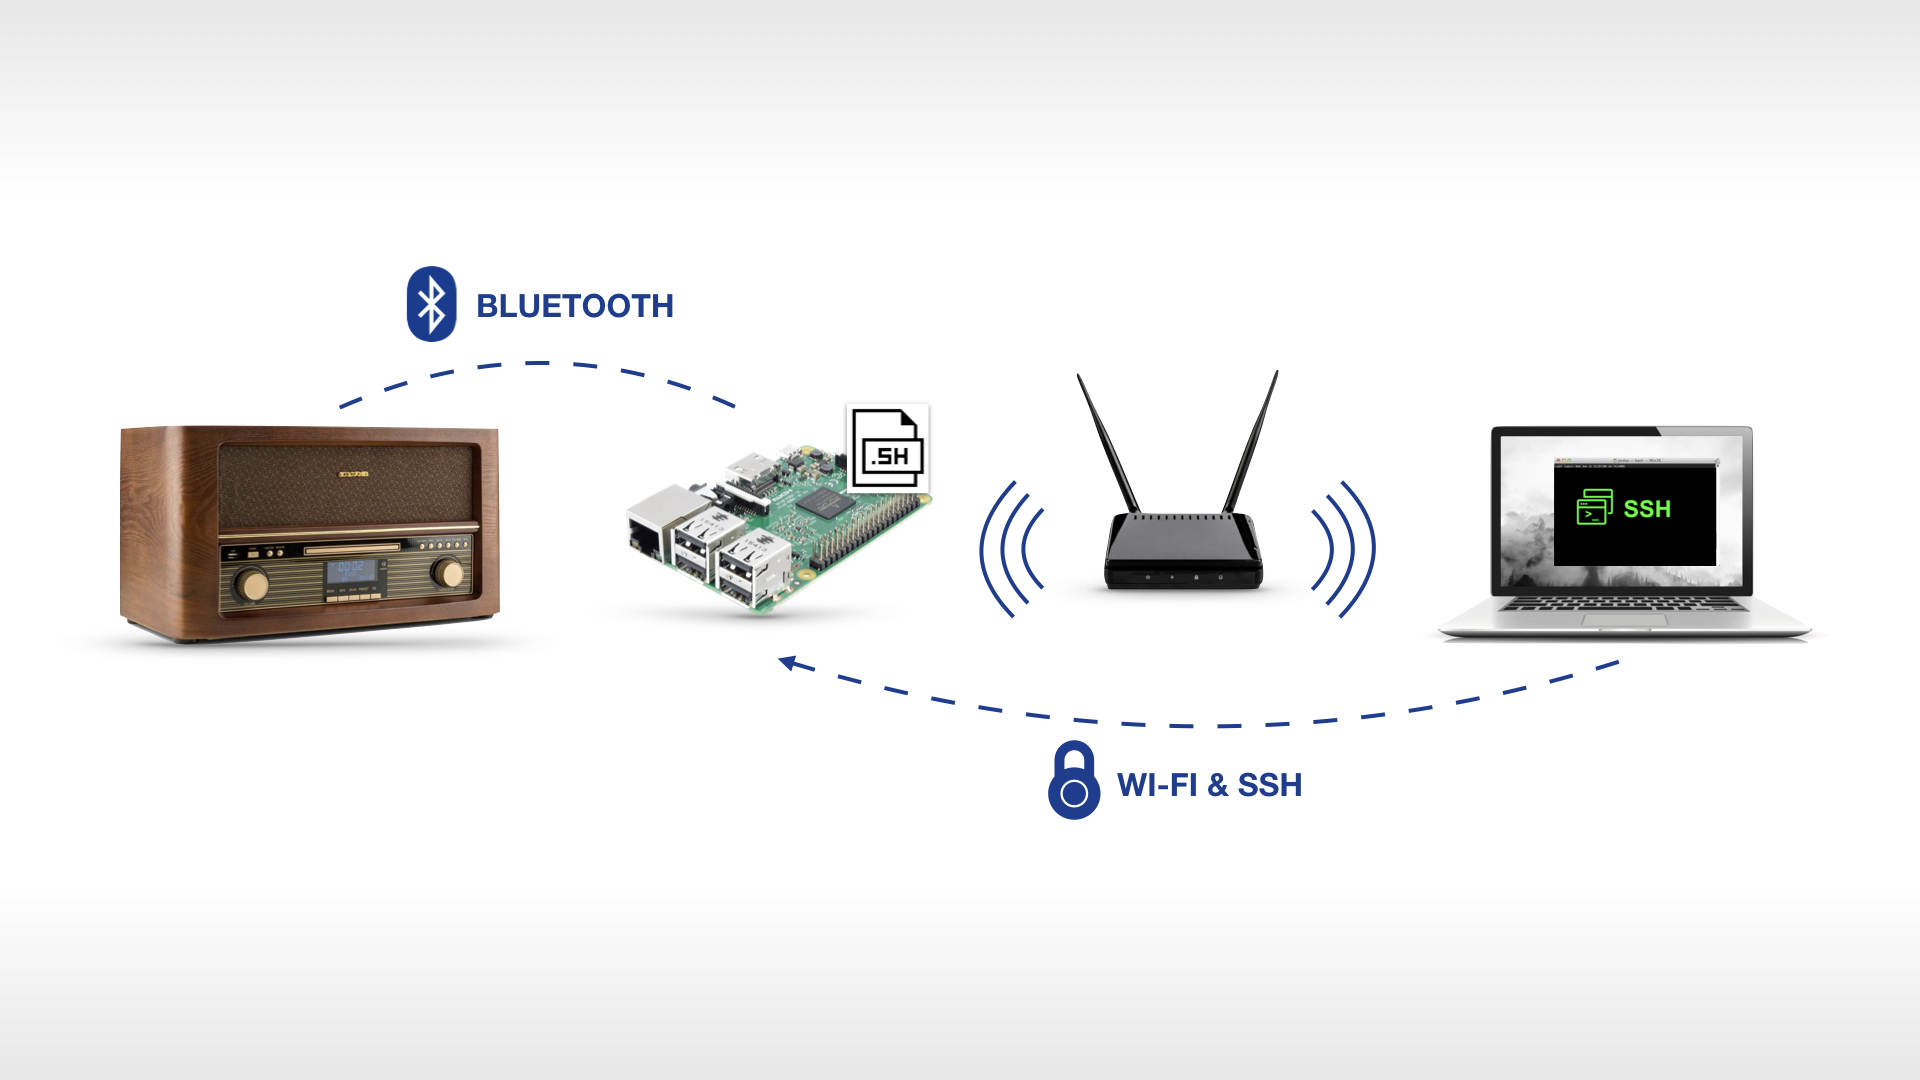
In times of increasing automation we wanted to look behind the scenes once more and hack a bluetooth-capable radio to an autoplay web radio with the help of a Raspberry Pi 3 and a autostart program. The communication from the laptop to the RasPi is done via SSH - from the RasPi to the radio via Bluetooth. The whole configuration (Bluetooth, VLC mediaplayer command, delays etc.) was coded in a Shell-Script file which was finally linked to the autostart directory of the Raspberry.
Necessary Hard- and Software
The realization of this project ist pretty easy due one won’t need too much hardware. Just:
- a laptop
- a Raspberry 3
- a bluetooth-capable radio and
- internet connection
Of course the tutorial also works with other single board computers based on Linux - as long as they have an internal chipset for the WiFi and Bluetooth.
First, an operating system must be set up on the RasPi – in our case Rasbian. After the successful installation of the operating system, the configuration of the Raspberry can be started. Depending on whether the RasPi is to be operated headless (via SSH) or with head (via keyboard and monitor), the network protocol Secure Shell (SSH) serves as communication interface to our RasPi. In our tutorial we descriped the operation of a headless RasPi using SSH and, in addition, higlighted the cryptographic encryption procedure of the SSH.
Connect RasPi with the radio
Most of us connect to Bluetooth devices on a daily basis - simply by using the Graphical User Interface (GUI) with keyboard and mouse. Of course, this is way faster and more intuitive. However, in our workshop we only connect with a few terminal commands to finally see the magic of automation emerge. If you save the commands in a shell script and include this small script in the autostart directory and .desktop-file of the Raspberry, the Raspberry automagically connects to the Bluetooth radio at each boot.
Some shell commands (see below) are necessary to connect to the radio. Please have in mind that the MAC address of the radio has to be replaced by the MAC address of your own radio. First open the Bluetooth control.
Note: $ stands for a command; > for the returning terminal prompt
$ bluetoothctl
> Agent registered
This command starts your own Bluetooth shell [bluetoothctl]#. All subsequent $ commands listed below are understood as [bluetooth]# commands.
$ power on
> changing power on succeeded

$ default-agent
> Default agent request successful

$ pairable on
> changing pairable on succeeded
This command is important in case you want to connect twice to one and the same device.
$ remove 12:34:56:78:9A:BC
> changing pairable on succeeded
Next, we want to scan the environment for Bluetooth devices. At this point, the MAC address of radio should appear.
$ scan on
> Discovery started
> [CHG] Device 12:34:56:78:9A:BC 12-34-56-78-9A-BC

$ scan off
> Discovery stopped
As soon as the radio shows up, you can pair with it. By pairing, the radio is added to the list of known Bluetooth devices.
$ pair 12:34:56:78:9A:BC
> Attempting to pair with 12:34:56:78:9A:BC
> [CHG] Device 12:34:56:78:9A:BC Connected: yes
> [CHG] Device 12:34:56:78:9A:BC ServicesResolved: yes
> [CHG] Device 12:34:56:78:9A:BC Paired: yes
> Pairing successful
The following command checks whether the pairing really worked. If yes, your radio should be listed.
$ devices
> Device 12:34:56:78:9A:BC MyRadioName
To let your RasPi automatically connect to your radio when it is switched on, you need to trust the device.
$ trust 12:34:56:78:9A:BC
> [CHG] Device 12:34:56:78:9A:BC Trusted: yes
> Changing 12:34:56:78:9A:BC trust succeeded
Finally: connect to radio.
$ connect 12:34:56:78:9A:BC
Connect to autostart & web radio channel
To make result is audible, we have added another command to the shell script. Note: we’re back in the default shell.
$ vlc myPlaylist.m3u
Using this command, the already pre-installed VLC media player of your RasPi opens playlist ‘myPlaylist’. With this command, all files like .mp3 files or other playlists, for example the playlist of your favorite web radio, are played one after the other. The playlist only needs to contain a URL to the corresponding web radio station.
Last but not least: include the shell script in the autostart To include a program in the autostart of the Raspberry, there are several ways. In our tutorial we’ve created a .desktop file to run our script every time the RasPi is booting up.
$ sudo geany /etc/xdg/autostart/nameOfYourFile.desktop&
Nice to know: by using the commercial ‘and’ at the end of the command, you can still operate the terminal even though the text editor is open.
The .desktop files have a prescribed schematic structure (within the .sh-file) which has to be considered.
[Desktop Entry]
Type=Application
Name=anyName
Terminal=false
Exec=/bin/sh /usr/bin/myScript.sh
After the attribute ‘Exec=…’ the command which will be executed during autostart (booting of the RasPi) is specified. Since we need several commands for the connection via Bluetooth and the playback of the web radio station, we would like to line a shell script ‘myScript’ which contains all the commands.
Little Teaser
If you got quite excited and would like to become active yourself, you can find further instructions in the detailed tutorial on GitHub. Among other things it explains how:
- the IP of the RasPi can be queried.
- the RasPi can be controlled via SSH.
- the .desktop autostart file should be created and stored.
- the audio output of the Raspberry can be set up.
- and much more
For those who don`t have a RasPi at home, one can borrow RasPi’s + accessories for free via Hacking Box. In addition, the CityLAB Berlin offers monthly participative workshops on topics such as Internet of Things, microcontrollers, Smart Home and hardware hacking.
If you have any questions about RasPi & web radio, Julia Zimmermann will be happy to help you.